Understanding Insulation Boards and Their Role Under Wooden Floors
Types of Insulation Boards Suitable for Wooden Floors
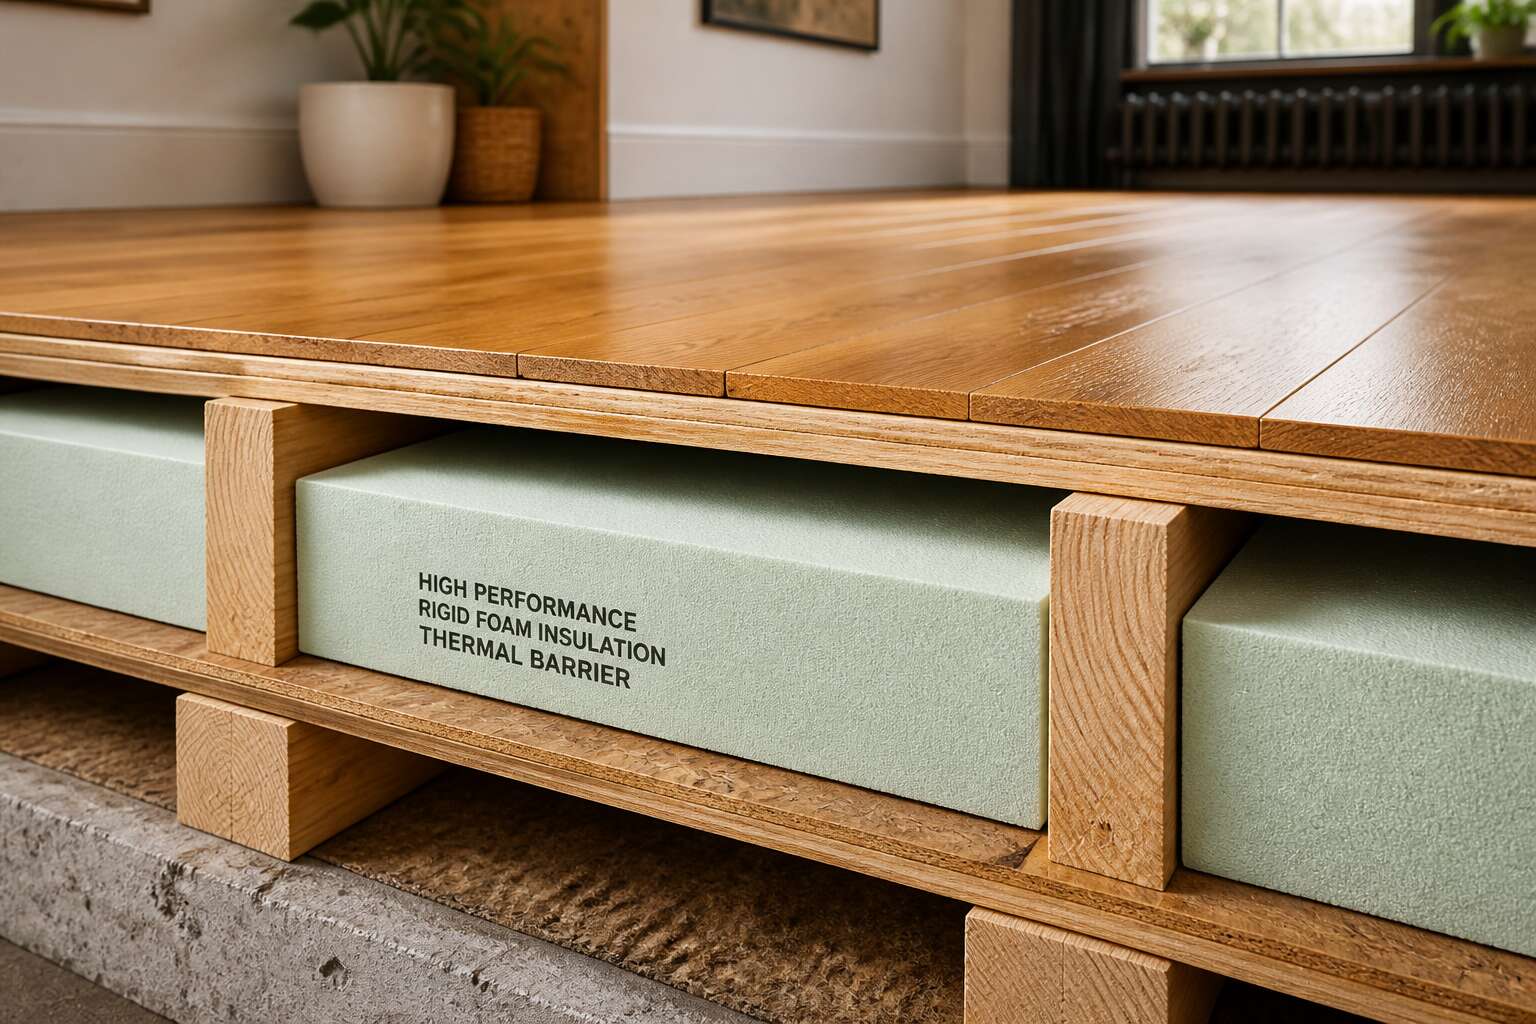
Most South African homes rest on suspended wooden floors, a design that leaves a cool, damp void beneath the living space. This cavity is the primary culprit behind cold floors and elevated energy bills in winter. An insulation board for wooden floors acts as a thermal break, effectively sealing that void from the room above. It transforms a drafty, uncomfortable surface into a stable, warm foundation.
The mechanics are straightforward. The board creates a physical barrier that halts the transfer of cold air from the subfloor. This intervention not only improves comfort underfoot but also reduces the workload on heating systems. In a climate where winter temperatures can be unforgiving, especially in the Highveld, this simple addition offers measurable returns in both comfort and efficiency. It also provides a crucial layer of acoustic dampening, minimising the transmission of impact noise between floor levels.
Selecting the right material depends on the specific conditions of your property. Here are the primary options:
– Extruded polystyrene (XPS): This rigid board is prized for its high compressive strength and resistance to moisture, making it ideal for ground floors or areas with high humidity.
– Polyurethane (PUR) and polyisocyanurate (PIR): These offer superior thermal performance in a thinner profile, which is useful when ceiling height is a concern.
– Wood fibre boards: For those prioritising breathability and natural materials, these provide good insulation and help regulate humidity, though they are less tolerant of direct moisture.
Each type of insulation board for wooden floors has its own performance profile. Understanding the local climate and the specific construction of your home will determine the most effective choice. The goal is to create a continuous, unbroken layer that maximises the thermal resistance of the entire floor assembly.
Why Wooden Floors Need Insulation Boards
In South Africa, a cold floor isn’t merely a thermal inconvenience; it is a persistent sensory reminder of the exposed void below. The psychological toll of walking on a frigid surface each morning often drives homeowners to crank up the heater, a reactive measure that treats the symptom rather than the source. An insulation board for wooden floors interrupts this cycle by addressing the fundamental physics of heat loss, creating a decisive barrier between the living area and the cold air mass lurking beneath the boards.
The installation of this material transforms the floor assembly into a monolithic thermal shield. Without it, the timber structure acts as a conductor, drawing warmth from the room and dissipating it into the earth. The board works by introducing a zone of high thermal resistance, which holds the internal temperature steady. This is not a minor enhancement; it is a structural correction. The comfort gain is immediate, but the operational benefit is quieter: the heating system runs less frequently, and the strain on the budget diminishes.
Beyond the raw thermal performance, the material contributes to the longevity of the floor itself. By stabilising temperature fluctuations, you reduce the expansion and contraction cycles that cause timber to warp or creak over time. The board also mitigates the ingress of ground moisture, a common culprit in coastal or Highveld regions. Consider the specific advantages:
– The subfloor void becomes a conditioned buffer, not an open gateway for cold.
– The overall building envelope is sealed, preventing drafts from migrating up through the skirting boards.
This integration creates a healthier living environment by limiting the cold bridging effect that occurs at the junctions of walls and floors. The result is a home that feels more solid, more enclosed, and fundamentally more secure against the external climate.
Key Performance Metrics: R-Value, Moisture Resistance, and Density
The quiet truth about a wooden floor is that its performance is decided long before the final coat of polish is applied. What happens beneath the boards is often the difference between a home that feels solid and one that seems to surrender to the cold. An insulation board for wooden floors is not a magical solution, but it is a rational one. When you evaluate these materials, three factors demand your attention: the R-Value, the moisture resistance, and the density of the board itself.
These three metrics are the pillars upon which comfort is built.
– R-Value: This is the measure of thermal resistance. The higher the number, the better the material stops heat from escaping through the floor. In a South African winter, where the chill creeps up from the ground, a high R-Value is your first line of defence. It is the silent barrier between your bare feet and the biting air trapped in the subfloor.
– Moisture Resistance: The ground beneath your home is alive with dampness. It rises, relentlessly, seeking any gap to enter. A board that absorbs this moisture will swell, warp, and ultimately fail. Worse, it transfers that dampness to the timber above, inviting rot and fungal growth. A closed-cell structure is essential. It acts as a shield, repelling the humidity before it can become a problem.
– Density: This is the board’s ability to withstand pressure without crushing. A board that compresses under the weight of furniture or foot traffic loses its insulating thickness, creating cold spots and uneven surfaces. Dense boards also excel at sound absorption, turning a room that echoes into one that feels private and grounded.
Consider the coastal regions, where the air is heavy with salt and moisture. Here, the insulation board for wooden floors is not just a comfort feature; it is a preservation tool. It prevents the dampness from reaching the joists and the underside of the timber, extending the life of the entire structure. In the Highveld, the concern shifts to cold. The temperature drops sharply, and a thin, low-density board will do little to stop the cold from radiating through the wooden planks. The thickness and the R-Value of the board become the determining factors between a room that is merely livable and one that is genuinely warm.
Selecting the right board is a matter of considering the specific climate and the construction of your home. The measurement of success is not in the looks, but in the silence of a room that holds its heat, and the absence of dampness in the air. Every layer matters, but few are as critical as the one you cannot see.
Top Benefits of Installing Insulation Board Under Wooden Floors
Enhanced Thermal Efficiency and Comfort
South Africans know the shock of a cold floor on a winter morning. That first step is a daily test of character. Proper insulation changes this ritual entirely. An insulation board for wooden floors does more than block heat loss; it moderates the entire space. The result is a home that feels consistently warm, not just near the fireplace but in every corner.
Consider how heat behaves underfoot. Without a barrier, warmth escapes into the crawlspace. With a quality board, that warmth stays where you live.
Here are the practical gains:
1. Steadier room temperatures, reducing reliance on heaters.
2. Reduced cold spots, especially near external walls.
3. Quieter transitions between rooms, as the board dampens sound.
Each benefit adds to daily comfort. You spend less time adjusting thermostats and more time enjoying your space, which is the true measure of a well dressed floor.
Soundproofing and Acoustic Insulation
Footsteps upstairs should not announce themselves in the living room below. A quiet home is a rare commodity, and the right insulation board for wooden floors changes how sound travels through a structure. Impact noise, the thud of a child running or a chair scraping, travels through the solid frame. The board interrupts that path.
- Airborne noise, such as conversation or a television, is absorbed rather than reflected.
- Structural noise is dampened at the source, reducing transfer between floors.
- Rooms feel more private, which matters in townhouses and cluster homes.
The result is a floor that feels solid and sounds quiet. In a country where many homes feature tiled ground floors and wooden upper levels, this separation of sound is essential. An insulation board for wooden floors serves double duty, calming the space while protecting the timber from moisture. That combination of peace and preservation makes it a quiet investment in more ways than one.
Moisture Barrier Against Dampness and Mold
South African summers bring humidity that creeps into timber. An insulation board for wooden floors acts as a barrier between the ground and your planks, stopping capillary moisture from rising. Without it, dampness settles into the subfloor, and mold takes hold.
The closed-cell structure resists water uptake while allowing the wood to breathe laterally. This prevents warping, cupping, and the musty odours that signal hidden decay. Coastal homes face salt-laden air and elevated humidity that press moisture upward.
Installing the board at the outset is cheaper than replacing swollen floorboards later. The protection is passive and works continuously without maintenance. For any timber floor built on a concrete slab, this layer is the difference between decades of service and early failure!
Long-Term Energy Savings and Lower Utility Bills
Every South African homeowner knows the sting of a summer electricity bill. But here’s the part most people miss: your floors are quietly working against you. Heat escapes through a concrete slab with alarming efficiency, forcing your air conditioner to work overtime just to maintain a comfortable temperature. The solution is simple, yet transformative.
An insulation board for wooden floors acts as a thermal break between the cold ground and your living space. It doesn’t just stop heat from escaping during those crisp Highveld winters; it also reflects radiant heat away during our scorching summers. This dual-action barrier means your HVAC system runs less frequently and for shorter cycles.
Consider the financial mechanics at play:
– Reduced energy consumption for heating and cooling systems
– Lower peak demand charges on time-of-use tariffs
– Extended lifespan of your flooring material due to stable temperatures
– Minimized need for additional heating appliances like underfloor heaters
The upfront cost of this material is often recovered within a few seasons. Think about that. A modest investment in rigid foam or reflective foil board translates into predictable, measurable savings month after month. When we talk about long-term value, this is where the rubber meets the road. Your choice of underlayment directly influences your monthly budget, making it a decision that pays for itself while you simply stand on it.
How to Choose the Right Insulation Board for Wooden Floors
Comparing Materials: EPS, XPS, PIR, and Mineral Wool
South Africa’s coastal humidity and Highveld temperature swings make material selection genuinely consequential. Polyisocyanurate (PIR) boards give you solid thermal performance in thinner profiles, which helps when raising the floor height creates awkward transitions at doorways. Extruded polystyrene (XPS) is forgiving and simple to cut, an advantage for less experienced DIY installers. Mineral wool holds a unique position: its springy edges create a snug friction fit, which speeds up installation significantly. However, it does not carry heavy compression loads as gracefully as the rigid foam options.
Weighing the true cost of an insulation board for wooden floors involves more than the shelf price per square metre. Consider these factors before committing:
- Check the compressive strength rating against heavy furniture and footfall patterns
- Confirm the board’s tolerance for the natural movement of timber in your climate
- Factor in delivery costs for thicker, more fragile boards that may require special handling
That careful assessment of your specific room conditions, your willingness to handle the material, and the structural constraints of your existing floor will guide you to the right fit.
Determining Required Thickness and R-Value
Determining the required thickness of an insulation board for wooden floors is about arithmetic, not guesswork. You must match the manufacturer’s R-value specifications against the highest point of the subfloor structure. I find that many homeowners forget a thicker board does not always mean a better result, it simply means cutting down the doorframe or losing ceiling height in a basement.
That leads to the core question: how do you measure it?
Always account for the thermal bridge created by the wooden joists when you calculate the overall resistance. A high R-value means nothing if the material is crushed under the weight of a grand piano. The true thickness should be specified based on the depth of your existing joists and the required clearance for an insulation board for wooden floors.
Moisture and Vapor Permeability Considerations
Moisture enters a wooden floor structure from above, from the ground below, and from the air that surrounds it. The vapour permeability of your insulation board for wooden floors must align with your climate’s seasonal rhythm.
In Cape Town’s winter, marine dampness presses against the subfloor. On the highveld, thunderstorms saturate the soil, and I have examined crawl spaces where the boards wept with condensation. A closed-cell board bars water vapour entirely, protecting joists but trapping existing moisture. An open-cell material lets the structure breathe, allowing humidity to escape gradually. Neither is superior; site conditions determine the correct choice.
Consider these factors when selecting a board:
- Presence of a ground vapour barrier
- Average relative humidity in the wettest month
- Whether the subfloor is ventilated or sealed
The insulation board for wooden floors becomes the boundary between warm interior and damp crawl space. Get this wrong and mould appears within two winters. Get it right and the floor stays dry for decades.
Environmental Impact and Sustainability
The construction sector in South Africa contributes significantly to national emissions. The insulation board for wooden floors you choose carries an embodied carbon load. I have seen well intentioned renovations undone by materials that looked green on the label but had a poor environmental record.
Look for boards with recycled content or closed loop manufacturing. Check for CFC free blowing agents and third party certifications like GreenTag or Eco Standard. Some manufacturers now offer boards made from agricultural waste, which performs well under timber floors and diverts biomass from landfill.
- Recycled content percentage
- CFC free blowing agents
- Local manufacturing proximity
- End of life recyclability
The insulation board for wooden floors you specify today will remain in service for thirty years. A board that performs well without excessive environmental cost serves the next generation. Sustainability is a measurable set of choices.
Budget-Friendly Options vs. Premium Performance
In South Africa, coastal moisture and highveld temperature swings test a floor’s integrity. Budget friendly boards such as EPS and mineral wool offer a lower initial price, but their R-value degrades under dampness, and replacement costs soon eclipse the meagre savings. Premium PIR or XPS boards demand a higher upfront figure, yet their closed cell structure sustains thermal resistance for decades. When comparing an insulation board for wooden floors, weigh the full service life, not the invoice alone. Consider the ledger:
- Cost per square meter against lifespan
- Thermal resistance after ten years of moisture exposure
- Compressive strength under foot traffic
- Disposal or recycling at decommissioning
The unsettling truth is that the cheapest product often becomes the most expensive. A poorly chosen board can settle, compress, and invite damp through the timber above.
Step-by-Step Installation Guide for Insulation Board Under Wooden Floors
Preparing the Subfloor: Cleaning and Leveling
Preparing the subfloor determines how well your insulation board for wooden floors performs. Begin by sweeping away all dust, loose grit, and old adhesive. For stubborn grime, scrub with a mild detergent, then rinse and allow the surface to dry fully. This prevents moisture from getting trapped beneath the board.
Next, level any uneven areas. Small dips can be filled with a patching compound, while larger low spots may require a self-leveling product. Apply the compound with a smooth trowel and let it set overnight. A straightedge helps confirm the floor is flat.
- Clear the room completely.
- Vacuum and sweep every corner.
- Wash and dry the subfloor.
- Fill cracks and smooth bumps.
Once the subfloor is even, your insulation board for wooden floors will sit snugly, reducing heat loss and avoiding stress on the planks above.
Measuring and Cutting Insulation Boards Accurately
A careless cut can waste an entire sheet of material, and that wasted material costs money. Before you measure anything, understand that accuracy here determines how well your insulation board for wooden floors will perform over time. Gaps allow heat to escape and create weak points that flex underfoot.
Measure the room’s length and width at several points. Old structures are rarely square, so take multiple readings and use the longest measurement for each direction. Transfer these dimensions onto the insulation board with a straightedge and a sharp marker. Cut slightly oversized when in doubt. You can always trim a board down, but you cannot add material back.
Plan the layout before you cut anything. Stagger the joints like brickwork to prevent long seams that telegraph through the floor. Work from one corner outward.
1. Measure the full area and divide it into board widths.
2. Mark each board with its position to avoid mixing up cut pieces.
3. Cut the last board in each row to fit the remaining space.
4. Label each piece with chalk for quick identification during installation.
Use a sharp utility knife for thinner boards. Score the surface firmly along the straightedge, then snap the board along the line. For thicker, denser panels, a fine-toothed handsaw or a circular saw with a masonry blade works better. A jigsaw can handle irregular shapes around door frames and pipework, but this requires patience and a steady hand.
Keep the cutting surface clean. Sawdust and debris from cutting can easily find their way beneath the boards and create unevenness. Sweep between cuts. The fit should feel snug against the subfloor and against neighbouring pieces, but never forced. A tight fit that requires hammering will compress the board and reduce its insulation value. The goal is a precise, uniform layer that sits flat and waits for the wooden floor above.
Laying the Boards and Ensuring a Tight Fit
Laying insulation board for wooden floors demands a quiet hand. Before the first panel touches the subfloor, align the layout from the longest wall. Work outward in rows, staggering the joints so no seam runs the full length. Press each board downward firmly; do not hammer or force it. A compressed board loses its insulation value.
- Butt each board tightly against its neighbour, checking for light gaps.
- Leave a small expansion gap along the walls.
- Walk over the laid boards to hear any movement.
These boards should sit flush against the subfloor and against neighbouring panels. A tight fit means no gaps, no flex, and no cold spots. Confirm each panel before moving on; the floor above will forgive nothing later.
Sealing Joints and Edges for Maximum Efficiency
Sealing the joints is where most installations lose their performance. A gap of just 2 millimetres may seem negligible, yet it can cut thermal efficiency by double digits. That is measurable waste underfoot.
Use aluminium foil tape for rigid panels and a flexible acrylic sealant for uneven edges. Press the tape down firmly, smoothing out every air pocket. The goal is a continuous vapour barrier across the whole surface. Pay attention to wall perimeters and pipe penetrations. An unsealed corner becomes a channel for cold air and moisture.
The sequence matters:
1. Tape all board-to-board seams.
2. Seal the perimeter with acoustic caulk.
3. Inspect service openings.
This method ensures the insulation board for wooden floors behaves as one unbroken thermal envelope. A properly sealed insulation board for wooden floors keeps warm air inside and damp out. That is the difference between a good floor and a great one.
Installing Underlayment and Final Wooden Flooring
Installing an insulation board for wooden floors is a straightforward job that dramatically changes how a room feels underfoot. The process rewards patience, as each layer relies on the one before it. Start with a subfloor that is clean, dry, and free of debris. Even small stones or lumps of dried adhesive create an uneven bed, which leads to cracking or squeaking later. Sweep thoroughly and use a levelling compound where needed; a flat base is the foundation of everything that follows.
Once the surface is ready, measure the room carefully. Boards are easy to cut with a sharp utility knife or a fine-toothed saw. Always score and snap rigid panels for a clean edge. When laying the material, fit the pieces tightly together. A small gap here translates into a thermal bridge later, so take the time to trim for awkward corners and door frames. Stagger the joints like brickwork to lock the layer together and prevent weak lines from forming.
The specific steps follow a logical order.
1. Cut the insulation board for wooden floors to size, leaving a 10mm expansion gap around the walls.
2. Lay the first row against the longest straight wall, ensuring the tongue or groove alignment is correct.
3. Continue across the room, pushing each sheet firmly against the previous one before securing it.
4. Use a staggered pattern for the following rows, trimming the end piece to start the next line.
Sealing the perimeter is just as critical as the board itself. Run a bead of flexible sealant along the expansion gap where the insulation meets the wall. This stops air from moving around the edges and also accommodates natural movement. Pay serious attention to pipes and cables that rise through the floor. Cut the board slightly oversized, then trim to fit snugly around the obstruction. Seal these penetrations individually to maintain the airtight barrier.
With the core layer down, the final flooring installation can begin. The rigid surface provides a stable base for floating timber, engineered wood, or even click-lock vinyl. The thermal performance remains effective only if the seams stay sealed during the process. Walk the room once more and press down on any panels that feel loose. For most homes in South Africa, where winters bring cold draughts through suspended floors, a properly fitted insulation board for wooden floors turns a chilly surface into a warm, consistent base. The effort pays off every single morning.
Common Installation Mistakes to Avoid
The quiet hum of a well-insulated home is a luxury many overlook until the cold creeps in. Before a single plank of oak or laminate touches the ground, the true character of a floor is decided in the layers beneath. Installing an insulation board for wooden floors is a straightforward job that dramatically changes how a room feels underfoot. It is a task that rewards patience and punishes haste, transforming a simple renovation into a lasting upgrade.
The process rewards patience, as each layer relies on the one before it. Start with a subfloor that is clean, dry, and free of debris. Even small stones or lumps of dried adhesive create an uneven bed, which leads to cracking or squeaking later. Sweep thoroughly and use a levelling compound where needed. A flat base is the foundation of everything that follows.
Once the surface is ready, measure the room carefully. Boards are easy to cut with a sharp utility knife or a fine-toothed saw. Always score and snap rigid panels for a clean edge. When laying the material, fit the pieces tightly together. A small gap here translates into a thermal bridge later, so take the time to trim for awkward corners and door frames. Stagger the joints like brickwork to lock the layer together and prevent weak lines from forming.
The specific steps follow a logical order. Cut the insulation board for wooden floors to size, leaving a 10mm expansion gap around the walls. Lay the first row against the longest straight wall, ensuring the tongue or groove alignment is correct. Continue across the room, pushing each sheet firmly against the previous one before securing it. Use a staggered pattern for the following rows, trimming the end piece to start the next line.
Sealing the perimeter is just as critical as the board itself. Run a flexible bead of sealant along the expansion gap where the insulation meets the wall. This stops air from moving around the edges and accommodates natural movement. Pay serious attention to pipes and cables that rise through the floor. Cut the board slightly oversized, then trim to fit snugly around the obstruction. Seal these penetrations individually to maintain an airtight barrier.
With the core layer down, the final flooring installation can begin. The rigid surface provides a stable base for floating timber, engineered wood, or even click-lock vinyl. The thermal performance remains effective only if the seams stay sealed during the process. Walk the room once more and press down on any panels that feel loose.
For most homes in South Africa, where winters bring cold draughts through suspended floors, a properly fitted insulation board for wooden floors turns a chilly surface into a warm, consistent base. The effort pays off every morning. When you step out of bed onto a floor that holds its heat, you will understand the quiet value of the work done beneath your feet.
Common Problems and Solutions When Using Insulation Boards
Dealing with Condensation and Moisture Buildup
By the time you notice a dark watermark, condensation has been working for weeks. Warm, humid air meets the cold underside of an insulation board for wooden floors, and water droplets form. South African coastal climates, with their sudden temperature swings, are unforgiving.
The trouble often hides! I have seen moisture migrate through unsealed seams, collect in low spots, or linger where airflow is throttled by debris. A musty odour, a spring in the boards, or peeling underlayment are the early signals.
- Beaded moisture on the subfloor surface.
- Dark stainig around board joints.
- A persistent earthy smell after rain.
Each symptom points to a breach in the vapour control layer. The board is not at fault; the assembly around it determines success. When you install an insulation board for wooden floors, continuity is everything. A torn sheet, a forgotten seam, a nail puncture. Water collects where the seal is weakest.
Addressing Uneven Surfaces and Gaps
Uneven surfaces are rarely visible until the boards go down. A floor that looks level can hide a slope of several millimetres, enough to make an insulation board for wooden floors rock or settle unevenly. I have seen installers skip the level check and regret it. The remedy starts before the first sheet is laid. A straightedge and a spirit level expose the culprit spots.
- Low spots: fill with self-levelling compound and allow full cure.
- High spots: sand or grind down to match the surrounding plane.
- Debris and protrusions: remove nails, screws, and loose mortar.
Gaps between boards create thermal bypasses. Conditioned air escapes through these thin openings, and the insulation board for wooden floors fails to perform. Cut each sheet with a sharp knife, leaving a small expansion margin. Shims or spacers keep joints uniform. Where gaps persist, expanding foam or acrylic sealant closes them after installation.
Reducing Acoustic Bridging and Impact Noise
Impact noise travels through the joists and framing, turning an insulation board for wooden floors into a sounding board. The usual culprit is rigid contact between the subfloor and the structure. When the board sits directly on the joists without a resilient layer, vibrations pass through unchecked.
Common signs of acoustic bridging include:
- Footsteps that echo in the room below
- A hollow drum sound when walking across the floor
- Noise radiating through walls and adjoining rooms
The fix starts with decoupling. Lay a resilient underlayment or acoustic mat beneath the insulation board for wooden floors. Seal the perimeter with a flexible sealant to stop flanking paths. For impact noise, add mass with a dense board and ensure all gaps are closed, because even small openings transmit sound.
Preventing Pest Infestation Within Insulation Layers
A single gap in the insulation layer can invite an entire rodent family. In South African homes, pests like rats and cockroaches often nest inside the warm, dark voids beneath wooden floors. An insulation board for wooden floors offers comfort, but it also creates a perfect harborage if left unprotected.
Common problems include chewing through foam boards, droppings that degrade air quality, and moisture from urine that encourages mold. The solution starts with choosing dense, closed-cell materials that resist gnawing. Seal every edge with expanding foam or metal mesh, and inspect the crawl space twice a year.
Consider these warning signs:
- Scratching sounds at night
- Small droppings near skirting boards
- Unexplained drafts despite insulation
Act before the colony settles, because once established, pests are difficult to remove without tearing up the floor.
Ensuring Long-Term Durability and Structural Integrity
The silence beneath a wooden floor can be deceptive. While the warm, dark void under your home offers excellent insulation properties, it also creates an inviting habitat for unwelcome guests. An insulation board for wooden floors does more than regulate temperature; it can either become a fortress against pests or their favoured nesting ground. In South Africa, the choice of material and installation method determines which outcome you get.
The most common problem begins with soft, open-cell foam boards. These materials are easily chewed through by rodents seeking shelter and warmth. Once the layer is breached, the damage spreads quickly. Droppings accumulate within the cavities, degrading indoor air quality, while urine creates persistent odours and accelerates moisture problems. This moisture then seeps into the wood above.
The solution lies in prevention through material selection. You need a rigid, closed-cell board that presents a physical barrier.
– Choose extruded polystyrene (XPS) over expanded polystyrene (EPS) for superior density.
– Seal all perimeter gaps with expanding foam, not just the visible joints.
– Install metal mesh over any ventilation openings before fitting the insulation.
These steps create a continuous, unbroken surface that resists intrusion. When you invest in quality insulation, you protect your home from both temperature swings and biological threats. A properly sealed floor system is a quiet, dry, and secure environment that lasts for decades, without requiring costly pest control interventions later.
Cost Analysis and Energy Savings with Insulation Boards
Average Material Costs for Different Board Types
Let’s talk money, because that’s where the romance of home renovation often fizzles out. You can have the most technically sound insulation board for wooden floors, but the price tag is what makes your wallet weep or sing. For a typical South African home, the average material cost per square metre for EPS is friendly, while PIR will make you raise an eyebrow. This upfront investment rarely reflects the actual long-term value your pocket will see.
The real story is in the arithmetic of your monthly utility bill. A high R-value insulation board for wooden floors creates a thermal barrier that stops your expensive heated air from escaping through the floorboards. Conversely, it blocks the relentless Cape Town cold from seeping up into your living room. You are effectively paying less to the energy provider every single month, which over a few winters, pays for the installation itself.
To give you a clearer picture of what you will hand over at the builder’s warehouse, here are the approximate averages:
- EPS (Expanded Polystyrene): R45 to R85 per square metre for a 50mm board.
- XPS (Extruded Polystyrene): R90 to R150 per square metre, stronger and more moisture resistant.
- PIR (Polyisocyanurate): R150 to R220 per square metre for a superior R-value.
- Mineral Wool: R70 to R110 per square metre, offering acoustic benefits alongside thermal.
The price difference between the budget options and premium materials is often substantial. I have seen homeowners choose the absolute cheapest option to save a few hundred Rand, then regret it when the energy savings are marginal. The higher density and better R-value of more expensive boards usually translate into a quicker payback period on your electricity account. Think of the initial cost as the size of the hole you dig now, versus the massive pile of cash you avoid digging into later for the power company.
Installation Labor Costs and DIY Options
Installation labor can cost as much as the insulation board for wooden floors itself. In South Africa, professional fitters charge between R80 and R150 per square metre, depending on subfloor complexity. That is why many homeowners attempt the DIY route. Cutting and laying is manageable, but you will spend a weekend kneeling on the subfloor.
For a 50 square metre room, hiring a pro adds R4,000 to R7,500. Doing it yourself costs only tools and patience. A sharp knife, straightedge, and tape measure suffice. You can save that cash for better material.
Consider these DIY steps:
– Measure twice, cut once.
– Stagger the joints between boards.
– Seal edges with acoustical sealant.
– Leave a 10mm expansion gap.
The long-term energy savings from a correctly installed insulation board for wooden floors will repay your effort within two winters.
Potential Energy Savings and Heating Bill Reductions
The real financial test for an insulation board for wooden floors happens on winter mornings. South African electricity tariffs climb every year, and heating a suspended wooden floor can consume a disproportionate share of household energy. An insulation board for wooden floors slows heat loss through the timber, forcing your underfloor heating or space heater to run shorter cycles and draw fewer kilowatts.
Heating-related electricity typically falls 15% to 25%, which means R800 to R1,500 back in a Johannesburg winter. The payback period for most boards lands between two and three winters. That calculation assumes consistent winter usage, nothing more!
- Local electricity tariff
- The R-value of the chosen board
- Climate zone and winter severity
- Exposure of the floor to cold air beneath
These variables shape the final payback period, but the direction is always the same: measurable savings on the monthly bill.
Calculating Return on Investment (ROI)
Every rand spent on insulation should work as hard as you do. Calculating ROI for an insulation board for wooden floors is a practical audit of your home’s thermal efficiency. You compare the installed cost against the monthly reduction in heating demand. That difference is your return. In South African homes, the equation often resolves within a few winters.
The calculation becomes more meaningful when you track your baseline consumption. Record your winter electricity use before installation, then measure the same period after. The gap reveals your true savings. Factor in the board’s lifespan and rising Eskom tariffs, and the long-term picture improves.
A proper ROI model should include:
– The board cost and delivery fees
– Underlayment, adhesives, and sealing tape
– Installation time, whether DIY or contracted
– The expected R-value performance over ten years
The return may be less dramatic in mild coastal zones than on the Highveld, but the principle holds. Every kilowatt not wasted is a kilowatt not billed.
Available Rebates, Tax Credits, and Incentives
South African homeowners rarely consider the financial incentives attached to thermal upgrades. While rebates remain scarce compared to European markets, specific municipalities offer property rate reductions for energy efficient renovations. The national building code now rewards higher R-values with faster plan approvals. An insulation board for wooden floors performs double duty: it reduces heating demand and strengthens your Energy Performance Certificate, which matters for future resale.
Consider these potential financial levers:
- Eskom’s delayed demand response programs occasionally fund insulation retrofits
- Some banks offer green home loans with reduced interest rates for certified efficiency upgrades
- Section 12B of the Income Tax Act covers renewable energy, not insulation, so your savings come from operational cost only
The real opportunity sits in avoided costs. Every winter without an insulation board for wooden floors is a winter of heat bleeding into the crawlspace. Municipal valuations rarely account for energy efficiency, creating a gap between your home’s actual worth and its assessed value. Your consumption data becomes the evidence needed to negotiate lower municipal rates in jurisdictions that value sustainability.


0 Comments