
Understanding wooden floor gap filler
What is wooden floor gap filler?
Seasonal light slips through the narrow seam between floorboards, and the room keeps its quiet stories. In South Africa, a well-chosen wooden floor gap filler does more than hide space—it preserves warmth and character. ‘Gaps aren’t mistakes; they’re part of a floor’s life,’ a veteran carpenter says.
Understanding what a wooden floor gap filler is helps you see the difference between a discreet finish and lasting restoration. It’s a ready-made compound that bridges gaps between boards, drying firm enough to sand and stain to match the timber. Options include flexible acrylics and color-matched putties.
Here are key considerations when choosing one:
- flexibility to accommodate seasonal movement
- color and grain matching for a seamless look
- sandability and finish compatibility with your floor
In busy kitchens and quiet lounges, the right filler quietly supports a floor that holds family moments and everyday echoes.
Why gaps occur in wooden flooring
Floorboards in South Africa breathe with the seasons; humidity swings can widen gaps by fractions of a millimetre each season, then close as rooms dry out. It’s a natural rhythm, not a fault, and understanding it helps you see why a wooden floor gap filler matters in maintenance and finish.
- Seasonal movement and humidity shifts
- Natural expansion and contraction of timber
- Subfloor settling and occasional board cupping
Gaps arise because of seasonal movement, timber’s natural expansion and contraction, and subfloor settling. When these forces play out, a filler provides a quiet bridge that preserves the floor’s continuity and character through time.
In busy South African spaces—from warm kitchens to quiet lounges—the floor’s seasonal dance remains legible, preserving warmth and character as boards meet the next change of season.
Types of gap fillers for wood floors
“Timber remembers the weather,” a craftsman whispered, and the room seemed to listen. Gaps are a season’s dialogue, and choosing the right wooden floor gap filler is part of a respectful maintenance ritual that preserves finish and warmth through time.
There are several families of options that balance aesthetics with durability. Each type brings a different texture and resilience to South African floors.
- Natural wood filler pastes that stain to blend with light or dark boards
- Epoxy or resin compounds for larger gaps and high-traffic areas
- Wax sticks for narrow seams and precise, subtle lines
- Flexible sealants such as silicone or acrylic designed to bend with seasonal movement
With the right wooden floor gap filler, the floor remains a continuous poem—quiet, enduring, and ready for the next season’s touch.
When to use gap filler
“Timber remembers the weather,” a craftsman whispered. Gaps in floors aren’t a flaw; they’re a seasonal chorus. Understanding wooden floor gap filler helps keep finish, warmth, and value in tune as the year turns.
Every room tells a different story: gaps open where boards breathe and close with humidity. A sensible approach weighs aesthetics against durability and matches wooden floor gap filler to the floor’s movement rather than trying to erase it.
- Visible seams between boards
- Seasonal movement in rooms with wide temperature swings
- Gaps around trim or fixed fixtures where movement is inevitable
In South African homes, the floor reads weather and wear differently; this balance keeps timber looking solid while rooms stay comfortable year-round.
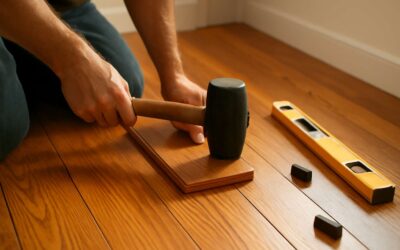
Materials and tools for applying wooden floor gap filler
Liquid wood filler vs paste filler
Gaps in timber floors aren’t just cosmetic—every tiny opening can invite drafts, especially in South Africa’s cooler mornings! The materials and tools chosen for applying a wooden floor gap filler shape the final appearance, whether liquid filler or a paste is used.
Liquid wood filler flows into hairline cracks and dries flexible, making it ideal for small gaps. Paste filler builds bulk for wider joints and surfaces even out with patience, though smoothing may be needed. Essential materials and tools include:
- Putty knife or spreader
- Mixing tray or small container
- Fine-grit sandpaper
- Vacuum or brush for debris
- Masking tape to protect edges
- Gloves and a damp cloth for cleanup
Whichever option is chosen, compatibility with timber finish and the room’s moisture level matters; movement in South African homes can reveal gaps again. The right wooden floor gap filler pairings preserve look and value.
Choosing filler colors to match wood
Gaps aren’t just gaps—they’re quiet leaks that steal morning warmth and invite drafts across timber floors. In South Africa, where mornings bite, the right approach to filler blends durability with aesthetic finesse, ensuring the joint line reads as a single surface rather than a patchwork.
Here are essential materials and tools for applying wooden floor gap filler.
- Putty knife or spreader
- Mixing tray or small container
- Fine-grit sandpaper
- Vacuum or brush for debris
- Masking tape to protect edges
- Gloves and a damp cloth for cleanup
Choosing filler colors to match wood means listening to the timber’s voice: base tone, grain movement, and how daylight travels across the room. Some fillers disappear into the wood; others mimic natural variations, lending a seamless, quiet longevity to a wooden floor gap filler that remains true over time.
Tools needed for proper application
Gaps aren’t merely spaces; they’re drafty invitations that steal morning warmth from South African homes. For a durable, aesthetically seamless finish, gather the right materials and apply them with care—the mark of a craftsman, not a botched patch. A well-executed wooden floor gap filler project earns quiet longevity, reading as a single surface rather than a patchwork.
Tools needed for proper application include:
- Putty knife or spreader
- Mixing tray or small container
- Fine-grit sandpaper
- Vacuum or brush for debris
- Masking tape to protect edges
- Gloves and a damp cloth for cleanup
Safety considerations and ventilation
Materials and tools for applying wooden floor gap filler form the quiet backbone of a flawless finish. Gather a quality filler, a mixing tray, a putty knife or spreader, fine-grit sandpaper, a vacuum or brush, masking tape, gloves, and a damp cloth. The wooden floor gap filler then whispers into the grain, claiming a seamless bond with the timber.
Safety considerations and ventilation are essential; work in a well-ventilated space to temper fumes and dust. Protective gear—gloves, a mask, and eye protection—helps keep hands and lungs unharmed, while open windows keep the room breathing in South African homes.
A well-prepared surface embraces wooden floor gap filler, letting it meld with the boards and cure as part of one surface.
Patience and restraint guide the craft, ensuring the final grain reads as a single story rather than a patchwork—an outcome that speaks of quiet longevity in any South African home.
Step-by-step guide to applying wooden floor gap filler
Preparation and cleaning of the floor
In the quiet hum of a sunlit workshop, a floor tells its story in every seam. “A floor is a memory laid in wood,” a South African craftsman once told me. With that mindset, the step to apply wooden floor gap filler becomes less about patching and more about preserving continuity.
Preparation and cleaning are the quiet rituals that enable a veneer to breathe. Start with a clean, dry surface—dust has teeth; it sneaks into joints and undermines finish. The right approach honours the grain and gives the filler a foundation that feels loyal and lasting.
Approach to texture and tone should be thoughtful rather than aggressive, letting the seam settle to a near invisibility. A well-chosen wooden floor gap filler harmonizes with the wood, restoring unity without shouting.
Applying the filler in gaps
In the quiet turn of a sunlit workshop, the job begins long before a brush touches wood. Inspecting joints, choosing color, listening to the wood—these are the rituals that guide the fill. The wooden floor gap filler waits, patient and honest, ready to settle the seam without shouting!
- Stir a small amount and test a dab in a hidden edge to check color and texture.
- Apply the filler in thin, deliberate layers, working with the grain.
- Wipe away excess with a damp cloth before it cures.
- Allow it to dry as instructed, then sand flush with the surface.
- Finish with the chosen seal or varnish for unity.
As the last grain settles, the room feels complete, and your floor tells its quiet, repaired story.
Smoothing and drying times
Inside South African homes, the quiet seam of a wooden floor tells a patient story. A craftsman’s whisper echoes: the grain remembers light and time. The wooden floor gap filler arrives as a calm agent, ready to settle the seam without shouting, letting the room breathe again!
A step-by-step rhythm unfolds:
- Test color and texture in a hidden edge to verify harmony with the surrounding timber.
- Apply in thin, deliberate layers, smoothing with the grain until the seam disappears.
- Wipe away excess, allow to dry, then sand flush and seal for unity.
When the last grain settles, the room feels complete, and the floor tells its repaired story with a quiet confidence.
Finishing touches and sealant options
Across South Africa, more than 60% of wooden floors reveal seasonal gaps that breathe with humidity. A calm, patient answer arrives in the form of a wooden floor gap filler—a quiet fix that lets a room breathe and the grain sing again.
A step-by-step rhythm unfolds: a measured approach where the filler meets the seam and then takes on the room’s light, quieting the seam without shouting and letting the timber tell its repaired story.
Finishing touches and sealant options to consider:
- Water-based polyurethane
- Oil-based polyurethane
- Solid-surface sealants
The result is a quiet, unified floor, where the wooden floor gap filler works behind the scenes to keep the boards speaking with one voice.
Common mistakes and how to avoid them
Across South Africa, more than 60% of wooden floors reveal seasonal gaps that breathe with humidity. The wooden floor gap filler arrives as a quiet partner, letting the room settle while the grain sings in a steadier key. It doesn’t shout; it anchors the boards.
Step-by-step rhythm to applying a filler follows three movements: assess the seam and the room’s light, invite the filler to meet the grain, and let the finish settle. It’s a measured dance—no haste, just harmony.
- Assess the seam
- Apply along the grain
- Let it dry and blend
Common mistakes and how to avoid them: rushing the job, color mismatch, and neglecting room acclimation. The wooden floor gap filler shines when you pace the task and test a discreet edge first.
- Rushing the process — take time
- Color mismatch — sample edge
- Skipping acclimation — note humidity
Maintenance and long-term care for filled gaps
Maintenance tips for filled gaps
Maintenance after filling is a patient art, not a one-off fix. A well-kept floor speaks of quiet confidence, and the wooden floor gap filler you chose deserves a long, attentive partnership with your home. Subtle cues—seasonal shifts, soft creaks—signal when care is doing its work.
Treat the surface with gentle affection: regular dusting, minimal moisture, and space for the boards to breathe. The long arc of protection rests not in heroic acts but in daily restraint. By observing movement and responding with patience, you extend the fill’s life—and yes, it rewards patience! The room it defines.
- Dust with a soft, dry cloth to prevent grit from abrading the finish.
- Maintain steady humidity and temperature to reduce timber movement.
- Wipe up spills promptly to keep the filler from absorbing moisture.
- When gaps reappear, seek a professional evaluation for appropriate care.
Repairing cracked filler or re-filling larger gaps
Maintenance is a patient art; the best wooden floor gap filler becomes part of an ongoing partnership with your home. In South Africa’s shifting seasons, the floor reveals its mood—tiny gaps, soft creaks—signals that care is doing its work. Dust lightly, manage humidity, and let the boards breathe.
When cracks appear or larger gaps reopen, repair or re-filling should be treated as part of long-term care. A professional evaluation helps ensure the wooden floor gap filler remains compatible with timber movement and finishes, preserving uniformity and avoiding future disturbances in rooms across SA homes.
To support lasting results, keep this gentle routine in view.
- Schedule a yearly assessment with a flooring pro
- Track humidity; aim for 40–60%
- Avoid over-filling; re-fill only when needed
That long arc of care rewards patience, preserving the room’s quiet definition.
When to consider professional help
SA homes don’t just settle; they negotiate with the weather. Humidity swings from roughly 40% to 60% nudge timber to sigh and gaps to grow. Maintenance is a patient art, and the best wooden floor gap filler becomes part of an ongoing partnership with your home.
- Gaps widen past a pin’s width after a refill
- Cracks reappear in the filler despite repairs
- Unevenness or creaks moving between rooms
When any of the above shows up, call in a pro for an evaluation that respects timber movement and finish compatibility. A skilled inspector can advise whether a new filler, refinishing, or a different approach is due, saving you future squeaks.
Long-term care means steady climate, measured humidity, and patience. Treat small seasonal shifts as part of the home’s rhythm, not a failure.
Choosing the right sealant and topcoat
In South African homes, timber breathes with the seasons; humidity swings from 40% to 60%, and the floor refuses to stay silent. Maintenance here is a patient art, an ongoing conversation with your house where gaps tell you something about movement and care.
Choosing sealant and topcoat matters. Look for products that bond well with filler, stay flexible as boards expand and contract, and resist yellowing under natural light. The best wooden floor gap filler is only as good as the coating that seals it, preserving harmony between tone and texture.
Long-term care means steady climate, measured humidity, and patience. Keep seasonal shifts in check with ventilation and controlled humidity where possible, and choose a topcoat that resists wear while remaining compatible with your filler. Regular light cleaning and gentle inspection help prevent surprises.
Color and texture troubleshooting
Timber breathes; your floor keeps the house honest, swaying with seasons and the South African sun. Gaps become pages of weather in winter and stages for movement in summer. “Wood keeps its own calendar,” a seasoned craftsman says. The wooden floor gap filler you chose should ride that calendar with you, not fight it.
- Watch for uneven fading where light hits; color changes often signal drift between filler and finish.
- Assess texture differences as boards swell and contract; gaps may reveal or exaggerate surface movement.
- Track wear and any yellowing; ensure the finish remains compatible with the filler to preserve tone.
Color and texture shifts tell the floor’s story. If patches look lighter or darker, or the grain reads differently, treat it as a sign to reevaluate the filler and topcoat. The dialogue between wood, finish, and light is ongoing, shaping long-term care with patience and respect.


0 Comments