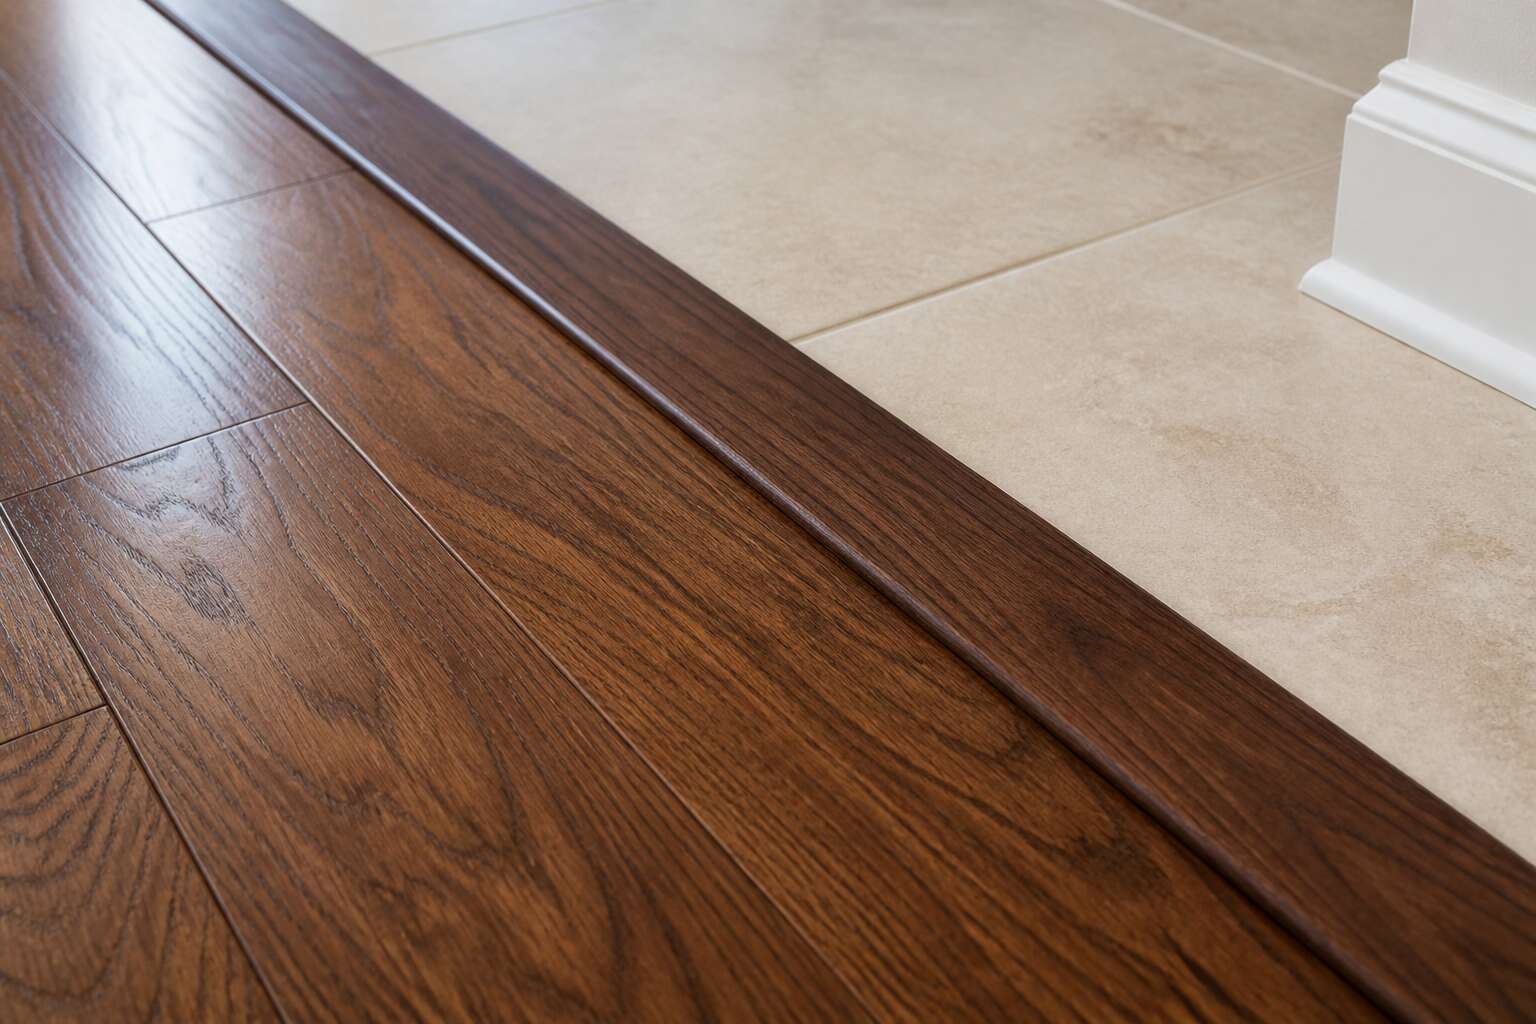
Understanding Floor Transition Essentials
Why Edge Profiles Matter for Flooring Longevity
Roughly 70% of premature flooring replacements stem from unprotected edges and weak transitions. In South Africa, where inland winters parch timber and coastal summers saturate it, the wooden floor trim endures stresses most homeowners never notice!
I have inspected hundreds of failing floors across Gauteng and the Western Cape. Proper transition essentials bridge differing floor heights and materials without forcing the boards to bear uneven pressure. Edge profiles shield the exposed end grain from moisture ingress and physical wear. Consider what these profiles actually accomplish:
- They seal the vulnerable cut edges against rising damp.
- They distribute foot traffic away from fragile corners.
- They allow natural expansion without visible buckling.
Without this protection, the wooden floor trim warps, splinters, and lifts within a few seasons. A well fitted profile is not decoration. It is the difference between a floor that endures and one that fails at the edges first.
Common Transition Strip Styles and Their Functions
Transition strips connect two floors, but they only work when chosen for the specific gap. In South African homes, the wooden floor trim often fails because the wrong profile forces boards to carry uneven weight. A reducer for a level joint is a classic mistake.
- T-moldings suit equal-width floors.
- Reducers manage a step down.
- Thresholds seal doorways and hide small level changes.
Secure each strip with a track rather than glue alone. That allows the material to move with seasonal humidity and keeps the transition tight for years.
How to Measure Flooring Edges for Accurate Fitting
Somewhere in Johannesburg, a homeowner is holding a tape measure upside down and hoping the wooden floor trim will magically shrink. It won’t. Measuring flooring edges is the least glamorous part of any renovation, but it is also the only part that saves you from a call to the handyman at 23:00 on a Sunday.
You need the exact height difference between the two surfaces at three points along the join. Do not measure once. Floors slope, screed bubbles, and timber swells with humidity. Those three readings give you a range to work with, not just a single number.
- Measure from the subfloor to the top of each surface.
- Record the largest gap, not the average.
- Allow 3 mm extra for the track and the trim’s expansion space.
The wooden floor trim profile you select depends on these numbers, not on how the showroom sample looked.
Assessing Subfloor Height Differences Before Selection
In Johannesburg, the Highveld’s dry winters and humid summers subject subfloors to a quiet drama. Concrete slabs shift, screeds settle, and timber boards respond to the air’s moisture long before the eye notices. Assessing subfloor height differences before selection is not a technical formality. It is an act of respect for the materials beneath your feet.
- Identify the higher surface and its material composition.
- Note any gradual slopes across the room’s length.
- Consider moisture readings for both the subfloor and the timber.
The wooden floor trim you choose must bridge the gap between two distinct surfaces without forcing either into submission. A height difference of a few millimetres dictates whether a low profile wooden floor trim works or whether you need a thicker threshold. Understand these essentials before the showroom. Your floors have already made their choices. The trim merely respects them.
Selecting the Right Material and Finish
Solid Wood vs. Engineered Profiles: Pros and Cons
The material you choose for wooden floor trim changes how the floor sounds underfoot! Solid wood profiles produce a warm, dense tone and survive sanding when scuffs appear. Engineered profiles use a real timber veneer over a stable core, which reduces warping in humid coastal rooms. The finish matters as much as the core. A matte lacquer hides scratches better than a high-gloss one, yet high-gloss amplifies grain depth. A quick comparison clarifies:
- Solid wood: timeless grain, but needs acclimatisation to your home’s climate.
- Engineered: dimensional stability, with a thin wear layer that limits refinishing.
For heated floors, engineered wooden floor trim performs reliably. For older houses with uneven walls, solid profiles can be scribed to fit without losing strength.
Matching Trim Species to Your Existing Flooring
A common failure in South African interiors appears when wooden floor trim ignores the floor’s own character. Species must align beneath your feet. Oak floors call for oak trim. Meranti and saligna are common here, yet each behaves differently. Meranti reads darker and more pronounced under the same household light. Saligna sits quieter against pale planks.
The finish carries responsibility too. A matte oiled floor beside a satin trim creates a sheen border. In Cape coastal light, this border flickers and distracts from the floor itself.
Several factors dictate how trim and floor relate:
- The room’s natural light at midday and dusk.
- Whether the floor runs deep or light in colour.
- The spacing of the floorboards beneath.
A sample board settles doubt faster than any photograph. Your wooden floor trim becomes part of the room’s permanent surface. Choose it with the floor in view.
Prefinished, Unfinished, or Stained-to-Match Options
I have watched site-applied varnish fail faster than a factory cure, especially along the Cape coast. Prefinished trim arrives with its topcoat already hardened under controlled heat. Unfinished material sits in a workshop for weeks before meeting your floor. Moisture in the air, whether the Highveld’s dry winters or the coast’s salt-laden breeze, changes how it accepts stain.
Stained-to-match is the trickiest route. You are chasing a colour that shifts with the light in your room. A timber that looks identical in the tin can darken differently once it touches the wood.
Consider these differences before committing:
- The factory finish’s thickness and resistance to scuffs.
- The on-site finish’s ability to blend edge gaps.
- The stain’s absorption rate, which varies with grain density.
Each choice alters your wooden floor trim’s response to sunlight and footfall. The wooden floor trim you install now will either settle into the floor or stand out from it.
Water-Resistant Alternatives for Kitchens and Bathrooms
Water damages wooden floor trim faster than almost anything else in a home, particularly in kitchens and bathrooms where spills happen daily. I have watched solid timber profiles swell and cup within months of installation near a double basin.
For wet areas, engineered profiles with a waterproof core, or PVC and composite alternatives that mimic timber grain, deserve attention. The latter need no sealing and tolerate standing moisture.
Here is what separates durable choices from failures:
– The substrate’s resistance to humidity, not just the surface finish
– Whether the profile expands at a rate compatible with your flooring
– The manufacturer’s warranty for wet-area installation
A composite profile can match the tone of your existing floors without absorbing the moisture that ruins solid timber.
Durability Ratings and Hardwood Grades
A single scratch can expose a floor’s age, yet wooden floor trim’s resilience depends on the finish layer. Durability ratings from the Taber abrasion test tell you more than any sales pitch. Look for a rating above 300 cycles for busy passageways or sunlit living areas!
Hardwood grades also dictate performance. Select grade gives tight grain; common grade shows character but risks weaker sections. In Cape Town’s coastal humidity, a stable engineered core with a 3mm wear layer outperforms thick solid stock that cups.
- Verify the finish’s UV resistance for sunlit interiors
- Confirm the grade matches your subfloor’s movement
I have seen clear grade fail fast on a damp screed. Choose wooden floor trim by performance data, not impulse, and the floor holds.
Installation Techniques for a Seamless Look
Essential Tools and Fastening Systems
A precise fit comes from controlling the fastening sequence rather than the cutting sequence. Pneumatic pin nailers with 18 gauge fasteners let you secure wooden floor trim without splitting the profile, but the angle of entry matters. Shoot at 45 degrees into the subfloor, never straight down through the face. A countersink punch set gives you control over pin depth, which then allows filler to sit flush with the surrounding grain. The essential kit includes:
– Pneumatic pin nailer
– Countersink punch
– Fine tooth mitre saw blade
– Moisture meter
Many installers overlook the role of humidity in South African coastal homes. Moisture movement in planks transfers directly to the trim. If you fix base shoe moulding rigidly to both floor and wall plate, seasonal expansion creates stress fractures at mitre joints. Proper fastening systems, such as slotted screw channels hidden behind the trim, accommodate that movement.
Cutting Accurate Inside and Outside Corners
Corners betray sloppy installation first. Nowhere is that clearer than in wooden floor trim. A plain mitre joint on an inside corner will open as the planks move underneath. Cope the profile instead. Saw the face clean, then remove the excess behind the front edge with a coping saw, undercutting slightly so the seam stays tight as the wood breathes.
Outside corners demand a different discipline. Walls drift by a few degrees, so locking the saw at forty five creates gaps at the base. Measure the actual corner with a bevel gauge and transfer that reading.
- Cut two offcuts at your calculated angle.
- Hold them against the corner.
- Adjust until the lips meet without a gap.
Short returns beat a long wrap on difficult corners, because they prevent end grain from becoming the focal point. When both techniques work in harmony, the wooden floor trim reads as intentional. I have spent enough hours on my knees with a coping saw to know the difference.
Gluing, Nailing, or Clipping: Which Method Works Best
Once the corners are coped and the returns are set, the next decision is how to anchor the wooden floor trim. Glue offers permanence but punishes mistakes. Nailing gives mechanical grip but risks splitting thin profiles. Clipping systems allow natural movement, a real advantage in South African climates where humidity shifts between seasons.
Subfloor material often dictates the method. Concrete demands adhesive. Timber subfloors tolerate nails or clips. Floating floors usually require clips.
- Glue suits solid substrates with stable conditions.
- Nails work best with thick profiles on timber.
- Clips accommodate expansion without visible fasteners.
Each method changes how the trim behaves over time. The right choice depends on the substrate and the climate surrounding it.
Handling Uneven Subfloors and Large Gaps
A 3 mm depression in a concrete slab is enough to snap a rigid profile within a year. In Johannesburg’s dry winters and humid summers, that movement compounds. Uneven subfloors demand a different approach. Instead of forcing the wooden floor trim flat, scribe its bottom edge to match the floor’s contour. Mark the high spots, plane the low ones, test fit repeatedly. For large gaps along the wall, fill with flexible sealant before fitting the trim. Never use rigid filler. It crushes under expansion. Here is a simple sequence:
- Run a straightedge across the floor to locate dips.
- Transfer the contour to the trim using a compass.
- Plane the back edge and dry fit until the gap disappears.
The result is a seamless line that moves with the house, not against it. That’s the real job of wooden floor trim.
Expansion Gaps and How to Protect Them
A solid hardwood floor can move eight millimetres across a four metre room between Johannesburg’s dry winter and humid summer. The wooden floor trim either absorbs that shift or transfers it into the wall. A profile nailed through the deck locks the board ends in place. The expansion gap disappears under the fasteners, and the floor has nowhere to go.
Fix the trim to the wall structure, never the floor. Screws reach past the plaster into the masonry. The profile spans the gap without touching the deck. Protecting the void requires a deliberate sequence:
- Vacuum the gap before fitting the trim.
- Press a closed cell foam backer rod into the void, leaving room for compression.
- Seal the top with flexible acoustic sealant.
I have yet to see a rigid filler survive a Highveld summer. The wooden floor trim hides the movement, but it cannot stop it. A seamless installation accommodates the gap.
Design and Styling Strategies
Contrasting vs. Blending with Flooring Tones
The visual weight of a room shifts with the tone of its wooden floor trim. Contrast draws the eye to every threshold and doorway, making each transition deliberate. Blending allows the floor to appear as one continuous surface. Neither approach is inherently correct. The choice depends on how much visual interruption you want between spaces.
Consider how trim tone interacts with existing flooring:
- Darker trim recedes into shadows in low light.
- Lighter trim expands the perceived depth of a narrow passage.
In South African interiors, where north-facing rooms receive limited winter daylight, a blend that matches the floor avoids harsh lines when light is scarce. When selecting wooden floor trim for sunlit areas, contrast can feel sharper than intended. Blending serves continuity; contrast suits spaces where definition matters more than flow.
Choosing Profile Height for Room Transitions
Profile height is the most overlooked dimension of a transition. A 2 millimetre difference is enough to catch a shoe heel! Your wooden floor trim must match the physical reality of the floor beneath it.
Low profiles suit level transitions. Taller profiles become necessary when one floor rises above another, when a thick solid timber floor meets a thin vinyl layer. The right height depends on the actual conditions:
- The vertical difference between the two floors
- The thickness of each flooring material at the edge
- The clearance of any door that swings over the transition
A profile set too low exposes a raw edge. One set too high creates a raised ridge that interrupts sight lines and footsteps. In South African homes, narrow thresholds and low internal doors amplify the problem. Wooden floor trim that matches the actual step height keeps the transition quiet and the foot confident.
Coordinating Trim with Baseboards and Door Casings
The eye follows the line where wall meets floor. When your wooden floor trim contrasts with your baseboards instead of echoing them, the room loses its cohesion. South African homes often feature painted plaster walls and simple skirting, a clean backdrop for a profile that echoes those lines.
The casing of a door is the second frame. Slender door frames demand a slim wooden floor trim; bulky profiles overpower the opening. Stained skirting asks for a matching trim, applied with the same stain batch.
The design logic runs three ways: the trim height aligns with the baseboard’s top edge, the profile mirrors the casing’s reveal, and the stain matches the skirting’s tone. When those three align, the threshold reads as one continuous gesture.
Using Threshold Strips to Define Open-Plan Spaces
Open-plan spaces fail when they lack a visual anchor. Threshold strips solve that without closing a single wall. A slim wooden floor trim set at the junction of the lounge and dining areas defines each zone while keeping the eye moving. This works because the strip introduces a change in level or profile that the brain registers as a boundary, not a barrier. For a seamless effect, align the strip with sight lines from the main entrance. Use a flush threshold for consistent flooring heights, or a step-down strip where the kitchen slab sits lower.
Design strategies vary by intent. One approach uses a darker strip to anchor a seating cluster. Another repeats the strip under a floating bookshelf to create rhythm. In practice, the best results come from observing how morning light falls across the space and letting that shadow guide your placement. The chosen wooden floor trim should complement the existing skirting without overpowering it.
Maintenance and Long-Term Care
Cleaning Techniques to Preserve the Finish
A floor wears out at its edges first, not the middle. Your wooden floor trim takes the daily punishment of feet, carts and cleaning equipment. A weekly dusting with a soft vacuum brush attachment keeps grit from grinding into the finish.
For deeper cleaning, wring your cloth until it is barely damp. Excess moisture seeps beneath the trim and softens the sealant. Abrasive pads and chemical strippers are out of the question. They dull the surface and shorten the life of the wooden floor trim. A microfiber cloth with lukewarm water removes scuffs without wearing down the protective layer. Steam cleaners are even worse, since the heat forces moisture into the joints. Keep it gentle, keep it dry, and the finish will outlast the trend!
Repairing Scratches, Dents, and Water Damage
Your wooden floor trim will eventually show its history: a scratch from a dragged chair, a dent from a dropped pan, or a dark stain of water damage. I have seen all three. Most blemishes yield to careful repair.
For shallow scratches, use a matching wood filler, then buff the spot with fine steel wool. Dents need a different hand: place a damp cloth over the depression and press a warm iron across it. The moisture swells the fibres back! Sand gently and blend the colour with restorative wax.
Water damage is the most serious problem. If the wooden floor trim has swollen or darkened, let it dry completely. Then follow this sequence:
- Sand the affected area, working along the grain.
- Apply a wood stain that matches the surrounding profile.
- Seal the repair with a durable topcoat.
Severe warping or splitting demands a full replacement.
Signs That It Is Time to Refinish or Replace
Wooden floor trim requires regular maintenance. Dust weekly and wipe with a nearly dry cloth. I apply a thin coat of polish every few months. Sunlight and humidity will still degrade the finish over time. Watch for these signs that refinishing or replacement is necessary:
- Water beads remain on the surface for more than a minute
- Small cracks appear along the length of the profile
- The colour has faded in patches that stain cannot even out
When the protective layer thins, sand the wooden floor trim lightly and apply a fresh topcoat. If the wood feels rough or the profiles have separated at the joints, refinishing will not solve the problem. Replacement is the straightforward choice. The trim has done its service!



0 Comments